Azure DevOps Service connections might be daunting from time to time what are they used for and what are they that’s where we’ll dive into.
What are the Azure DevOps service connections?
Service connections in Azure DevOps are crucial configurations that link your Azure DevOps projects with external services or resources. Azure DevOps, as some of you might know, is a CI/CD tool and so much more. It enables teams to deploy code from a central Git-based repository, similar to GitHub, onto various platforms like Kubernetes clusters, Azure, and beyond. Service connections provide the necessary authentication and authorization, ensuring secure integration and streamlined deployment workflows, which are essential for efficient development, testing, and deployment activities.
How do I set up an Azure DevOps Service Connection?
– You start by heading to Azure DevOps
– You then go to the project in question.
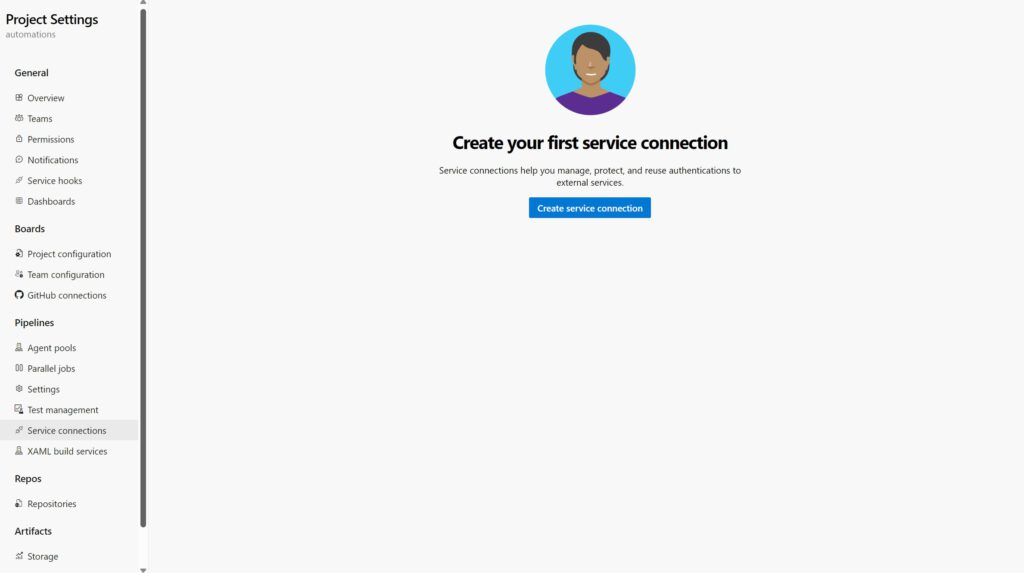
– In the left lower corner you can then select “project settings” followed by “Service connections” under the “Pipelines” section
– When you open the Azure DevOps service connection page it might look like this. If there is one present already you can add/create a new one by pressing the button in the right upper corner.
If you would like to add a new connection you press new connection button in the right upper corner. You will then see
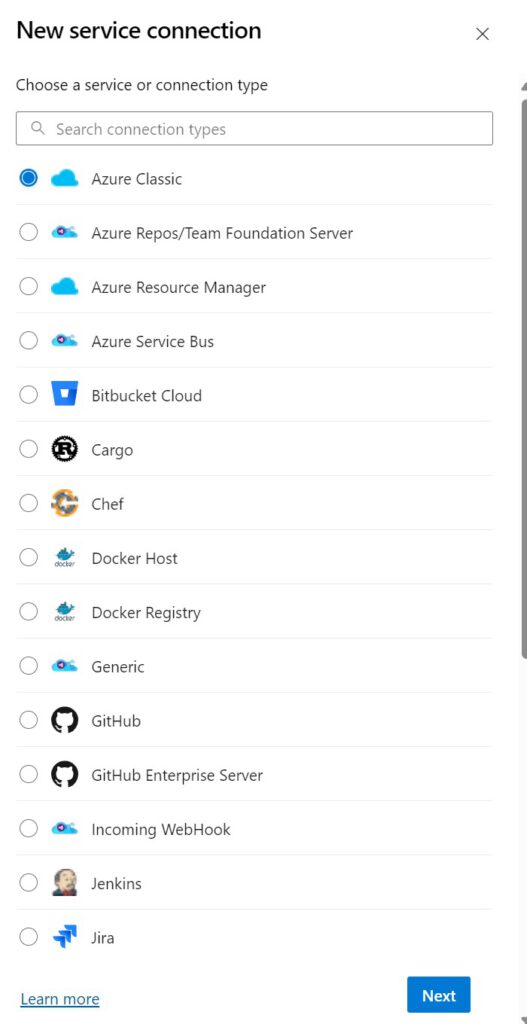
In this tutorial I will solely focus on Azure Resource Manager (ARM in short) as this is the newest and most up to date method for establishing a connection to DEPLOY RESOURCES on azure.
Once you have selected the Azure Resource Manager option as shown here, you should see the below
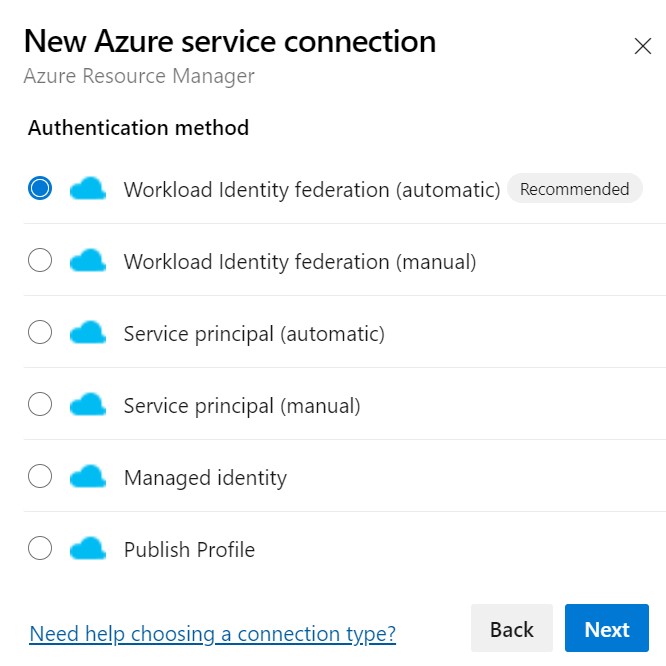
You then have several options to choose from. The most common ones are either through the form of an app registration (WorkloadIdentityFederation and Service Principal) or through a Managed Identity.
The WorkloadIdentityFederation both automatic and manual are the newest of the bunch. But that does not mean they are necessarily better. Below a quick table to show the differences between all of them.
| Feature/Option | WorkloadIdentityFederation (Automatic) | WorkloadIdentityFederation (Manual) | Service Principal (Automatic) | Service Principal (Manual) | Managed Identity |
|---|---|---|---|---|---|
| Setup | Automatic deployment | Manual setup | Automated through Azure CLI | Manual configuration | Cloud-managed |
| Ease of Deployment | Smooth experience | More complex setup | Streamlined via automation | Manual steps needed | Simplified for Azure |
| Ease of Maintenance | Difficult with many connections | Easier, uses one app registration | Moderate complexity | Requires regular updates | Minimal maintenance |
| Scalability | Can handle many connections | Limited to 20 service connections | Scalable, automated renewal | Scalable, manual oversight | Scalable within Azure |
| Use Case Flexibility | Good for dynamic environments | Suitable for smaller setups | Flexible with automation | Flexible with manual control | Best for Azure resources |
| Authentication Type | Federated identity | Federated identity | Service Principal credentials | Service Principal credentials | Integrated with Azure AD |
| Limitations | Permission maintenance complexity | Max 20 connections | Permission Maintenance complexity, Requires credential updates | Manual credential handling | Limited to Azure services |
So you found what you need and decided to go with WorkloadIdentityFederation (automatic) or Manual.
With the automatic deployment it will be a smooth experience in deploying itself but it will be difficult maintaining permissions over time especially if the amount of connections tend to grow overtime.
With manual on the other end it will be a lot easier as you will be able to use one app registration for multiple service connections, the down part is that you cannot use more than 20 at ANY GIVEN TIME. Hence as need more than 20, workload identity is a no for now.
WorkloadIdentityFederation (automatic):
1. When setting up the automatic Workload Identity Federation one, it will look like this:
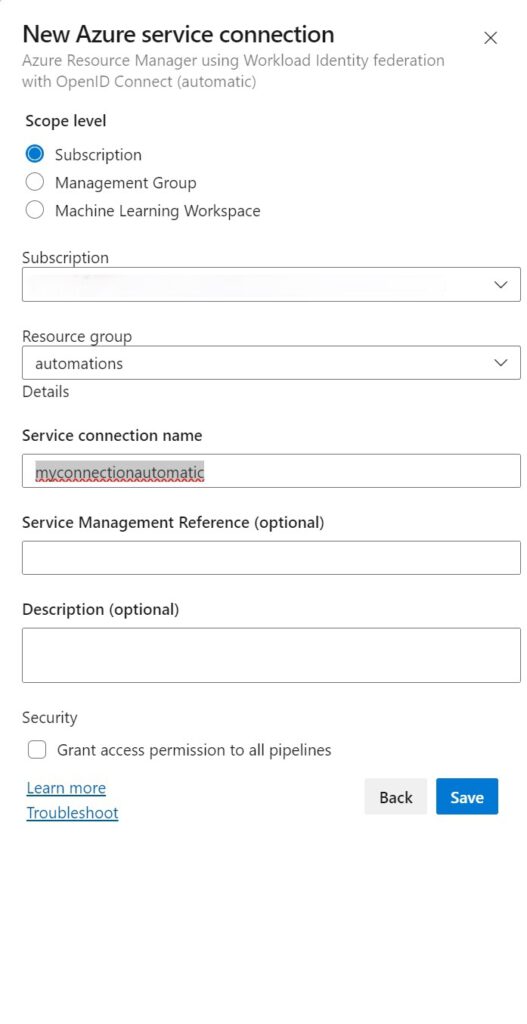
- 2. You can then set the scope at a subscription level (just permissions for 1 subscription) or a management group level (if configured, make it simpler to manage multiple subscriptions or run multiple pipelines over 1 service endpoint).
For the sake of complexity I will not get into the Machine Learning Workspaces, as in practice, I rarely see these being used as a scope. - 3. You can then choose the subscription/RG name followed by a chosen service connection name (and fill out optional fields)
- 4. Lastly before wrapping up and hitting “save” you can grant all pipelines permission to use this service endpoint. Please ONLY set this if that is a requirement as it poses risks in terms of security. Especially if it’s a project with multiple teams working on an application/platform.
- 5. When you now hit save you will see something like this. I added a few notes as for the actions you could do with each.
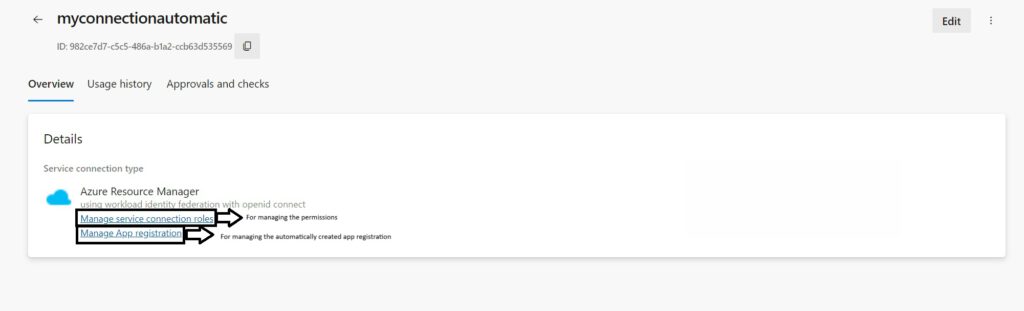
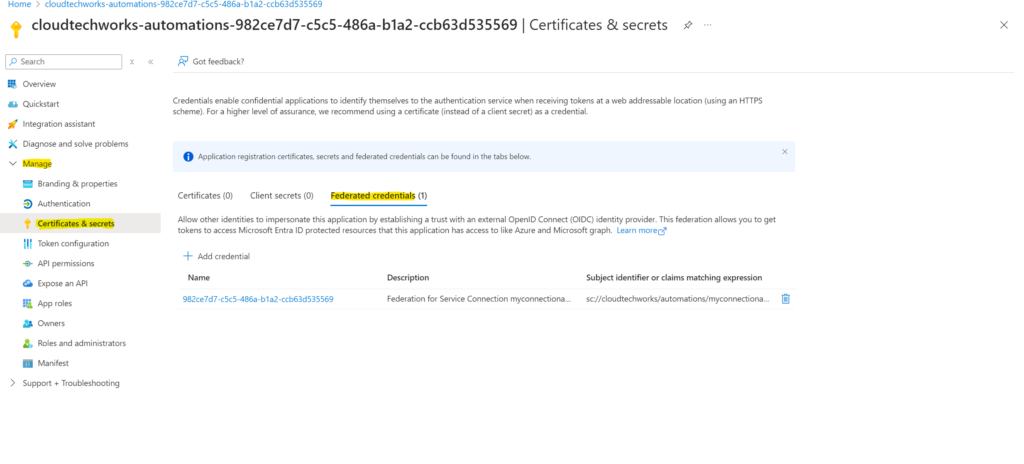
- 6. When you then hit “Manage App Registration” you can then see under “Manage” > “Certificates & Secrets” > “Federated Credentials” that the underlying credential is/has been created.
- 7. Write down the name of the app registration and proceed to the shared steps section
WorkloadIdentityFederation (manual)
- 1. When setting up the manual Workload Identity Federation one, it will look like this. Please fill out a connection name and (perhaps) a reference and Description.
Before hitting “save” you can grant all pipelines permission to use this service endpoint (see the checkbox in the bottom). Please ONLY set this if that is a requirement as it poses risks in terms of security. Especially if it’s a project with multiple teams working on an application/platform.
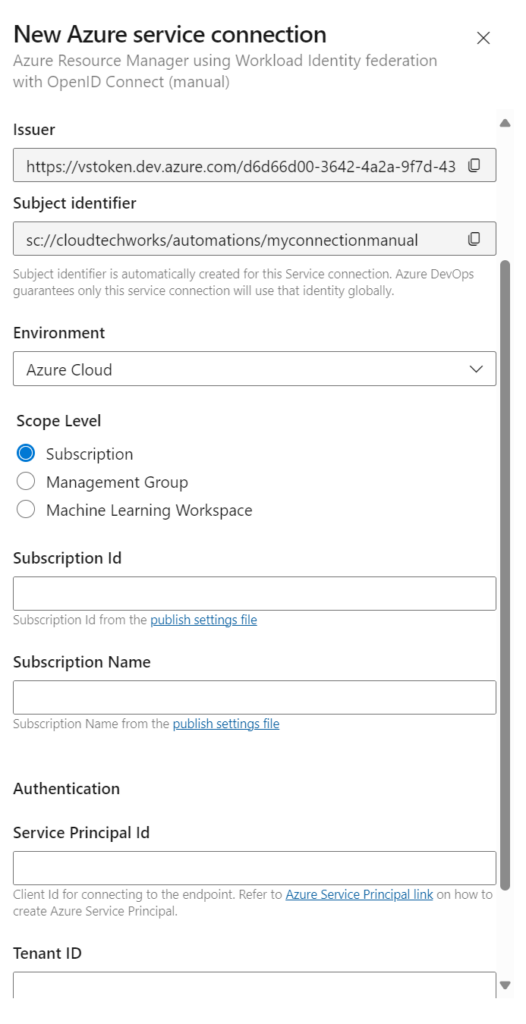
- 2. You can then set the scope at a subscription level (just permissions for 1 subscription) or a management group level (if configured, make it simpler to manage multiple subscriptions or run multiple pipelines over 1 service endpoint).
For the sake of complexity I will not get into the Machine Learning Workspaces, as in practice, I rarely see these being used as a scope. - 3. You can then enter the SubscriptionName and SubscriptionID OR ManagementGroupName and ManagementGroupID, depending on the scope selected. (can be copied from the Azure Portal) followed by the tenantID (can be found by going to Settings – Microsoft Azure, and copying the directory address from there)
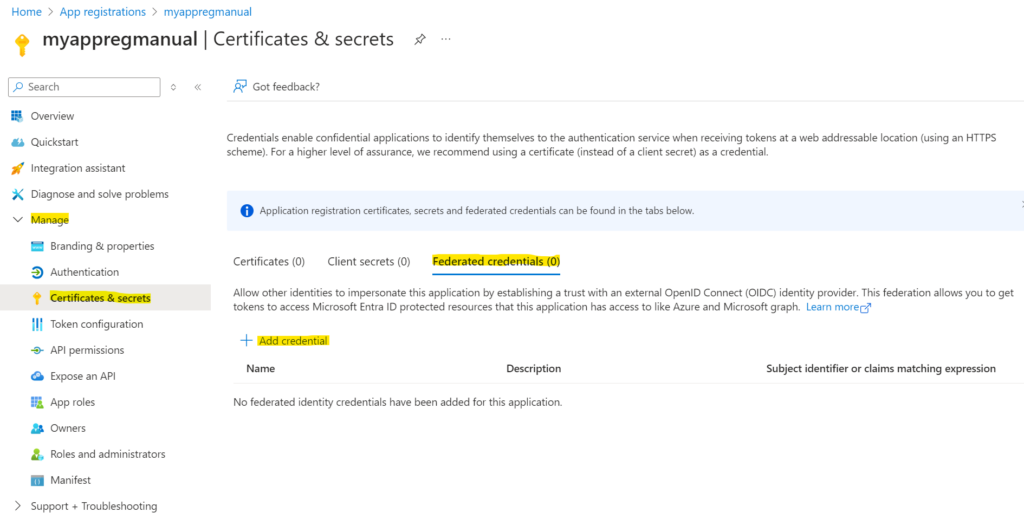
- 4. Go to the existing app registration and search for your app registration (in my case myappregmanual). In the overview you can copy the Application ID. You can use this in the “Service Principal Id” field. You then still have to perfom some steps to configure the Issuer and Subject Identifier
- 5. You now press Add Credential and select “Other issuer” in the dropdown.
You will then get a screen like this.
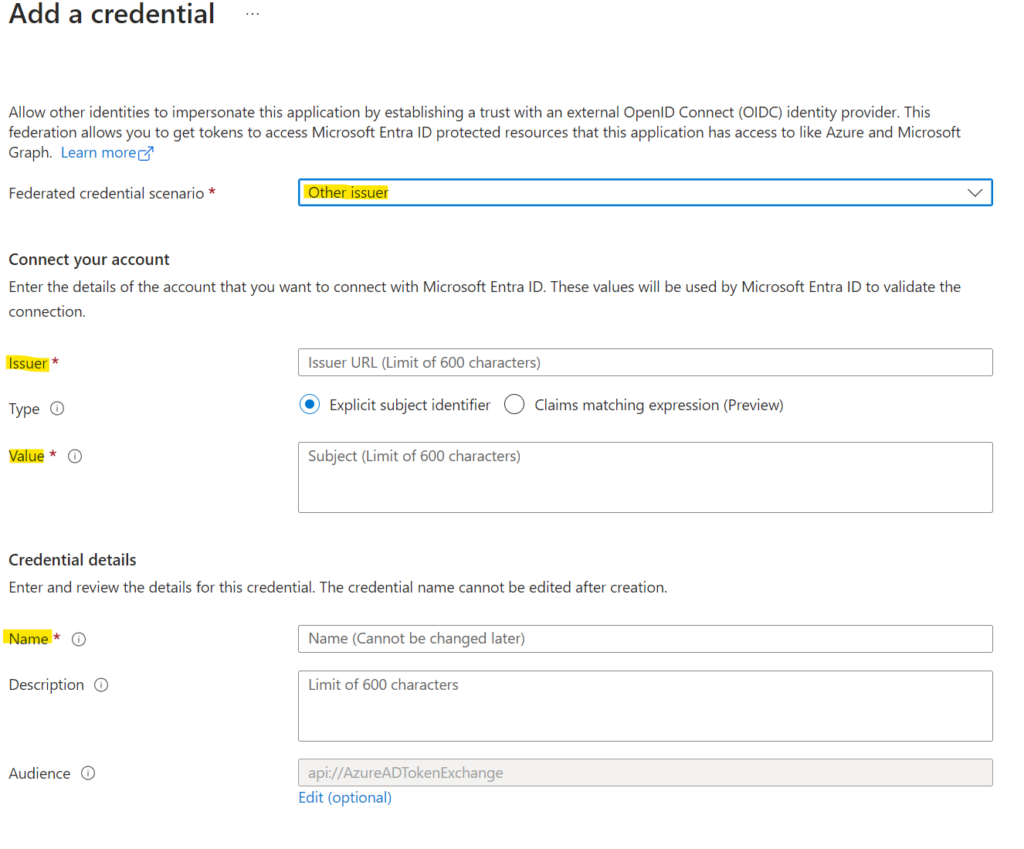
- 6. Please enter your issuer URL and Value as given in the service connection creation overview.
Then add a name for this credential. I advise you to keep it similar or the same with the service connection. Especially if you plan on having multiple service connections using Workload Identity Federation for authentication (with the same service principal).
Now finally press add and, on the service connection, press save and validate. It will ensure the connection has been created succesfully. - 7. Write down the name of the app registration and proceed to the shared steps.
Service Principal (Automatic)
- 1. When setting up the automatic Service Principal one, it will look like this:
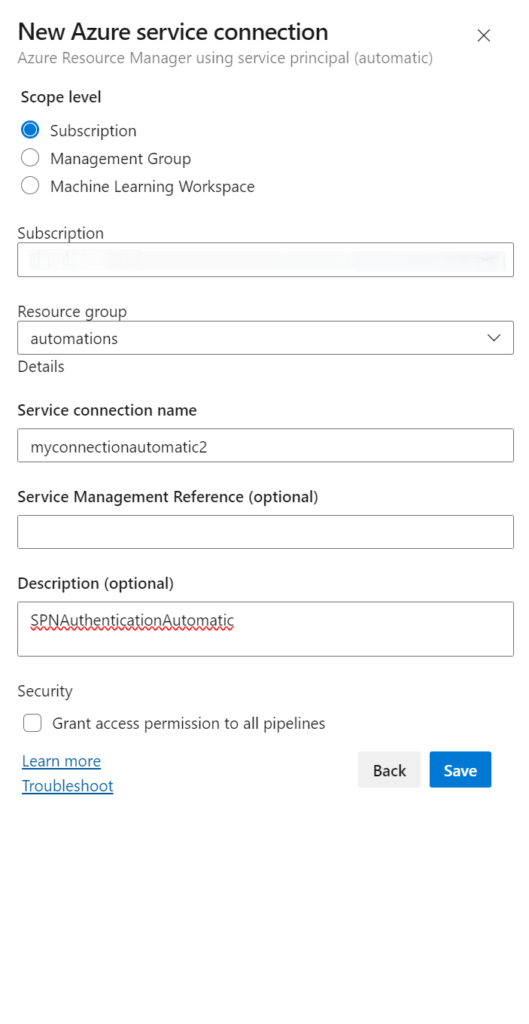
- 2. You can then set the scope at a subscription level (just permissions for 1 subscription) or a management group level (if configured, make it simpler to manage multiple subscriptions or run multiple pipelines over 1 service endpoint).
For the sake of complexity I will not get into the Machine Learning Workspaces, as in practice, I rarely see these being used as a scope. - 3. You can then choose the subscription/RG name followed by a chosen service connection name (and fill out optional fields)
- 4. Lastly before wrapping up and hitting “save” you can grant all pipelines permission to use this service endpoint. Please ONLY set this if that is a requirement as it poses risks in terms of security. Especially if it’s a project with multiple teams working on an application/platform.
- 5. When you now hit save the connection will be created. It will look like this.
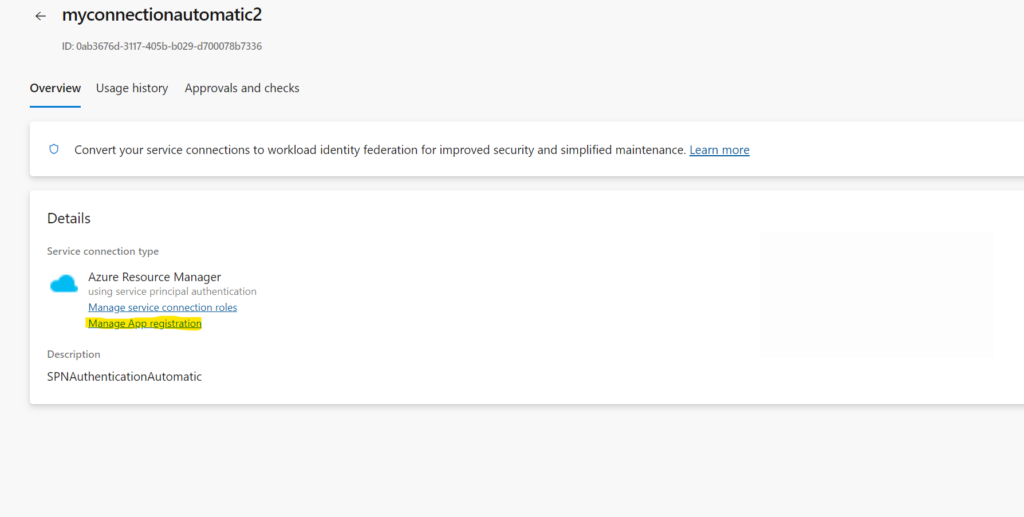
- 6. When you then hit “Manage App Registration” as shown in the screenshot, you can then see under “Manage” > “Certificates & Secrets” > “Client Secrets” that the underlying credential is/has been created
- 7. Write down the name of the app registration and proceed to the shared steps.
Service Principal (Manual)
- 1. When setting up the manual Service Principal one, it will look like this:
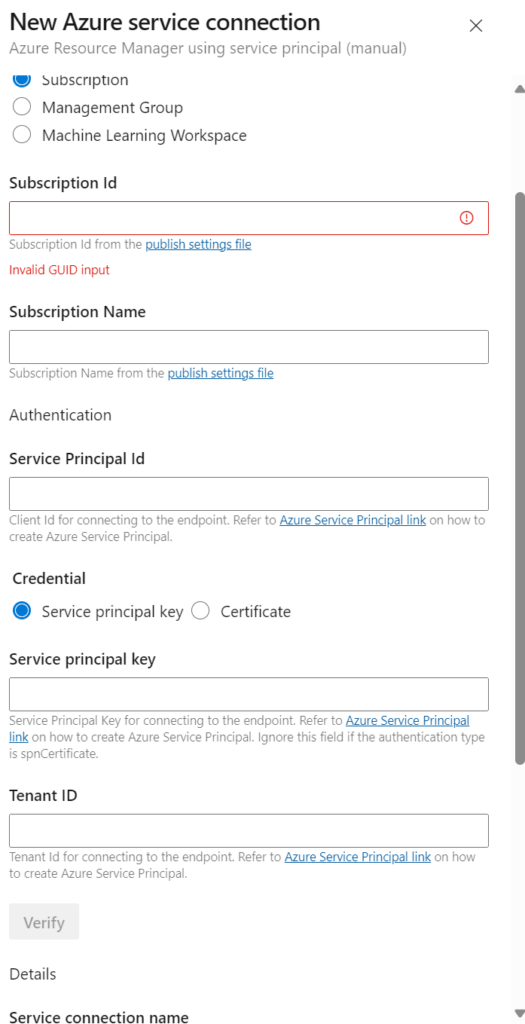
- 2. You can then set the scope at a subscription level (just permissions for 1 subscription) or a management group level (if configured, make it simpler to manage multiple subscriptions or run multiple pipelines over 1 service endpoint).
For the sake of complexity I will not get into the Machine Learning Workspaces, as in practice, I rarely see these being used as a scope. - 3. You can then enter the SubscriptionName and SubscriptionID OR ManagementGroupName and ManagementGroupID, depending on the scope selected. (can be copied from the Azure Portal) followed by the tenantID (can be found by going to Settings – Microsoft Azure, and copying the directory address from there)
- 4. Go to the existing app registration and search for your app registration (in my case myappregmanual). In the overview you can copy the Application ID. You can use this in the “Service Principal Id” field.
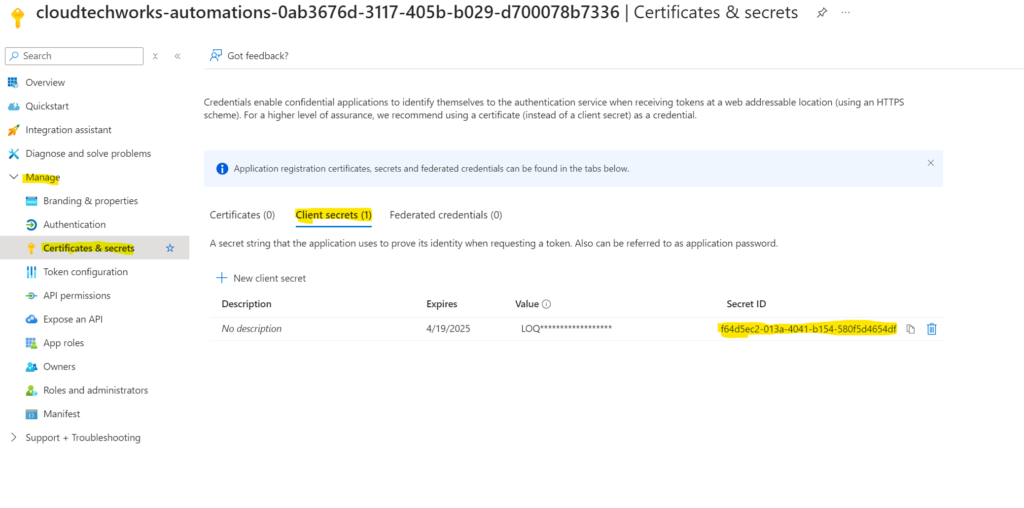
5. Afterwards, stay in the portal to upload a certificate (or reference to a previously uploaded one) or add a new secret. I will focus just on the Secret for this tutorial.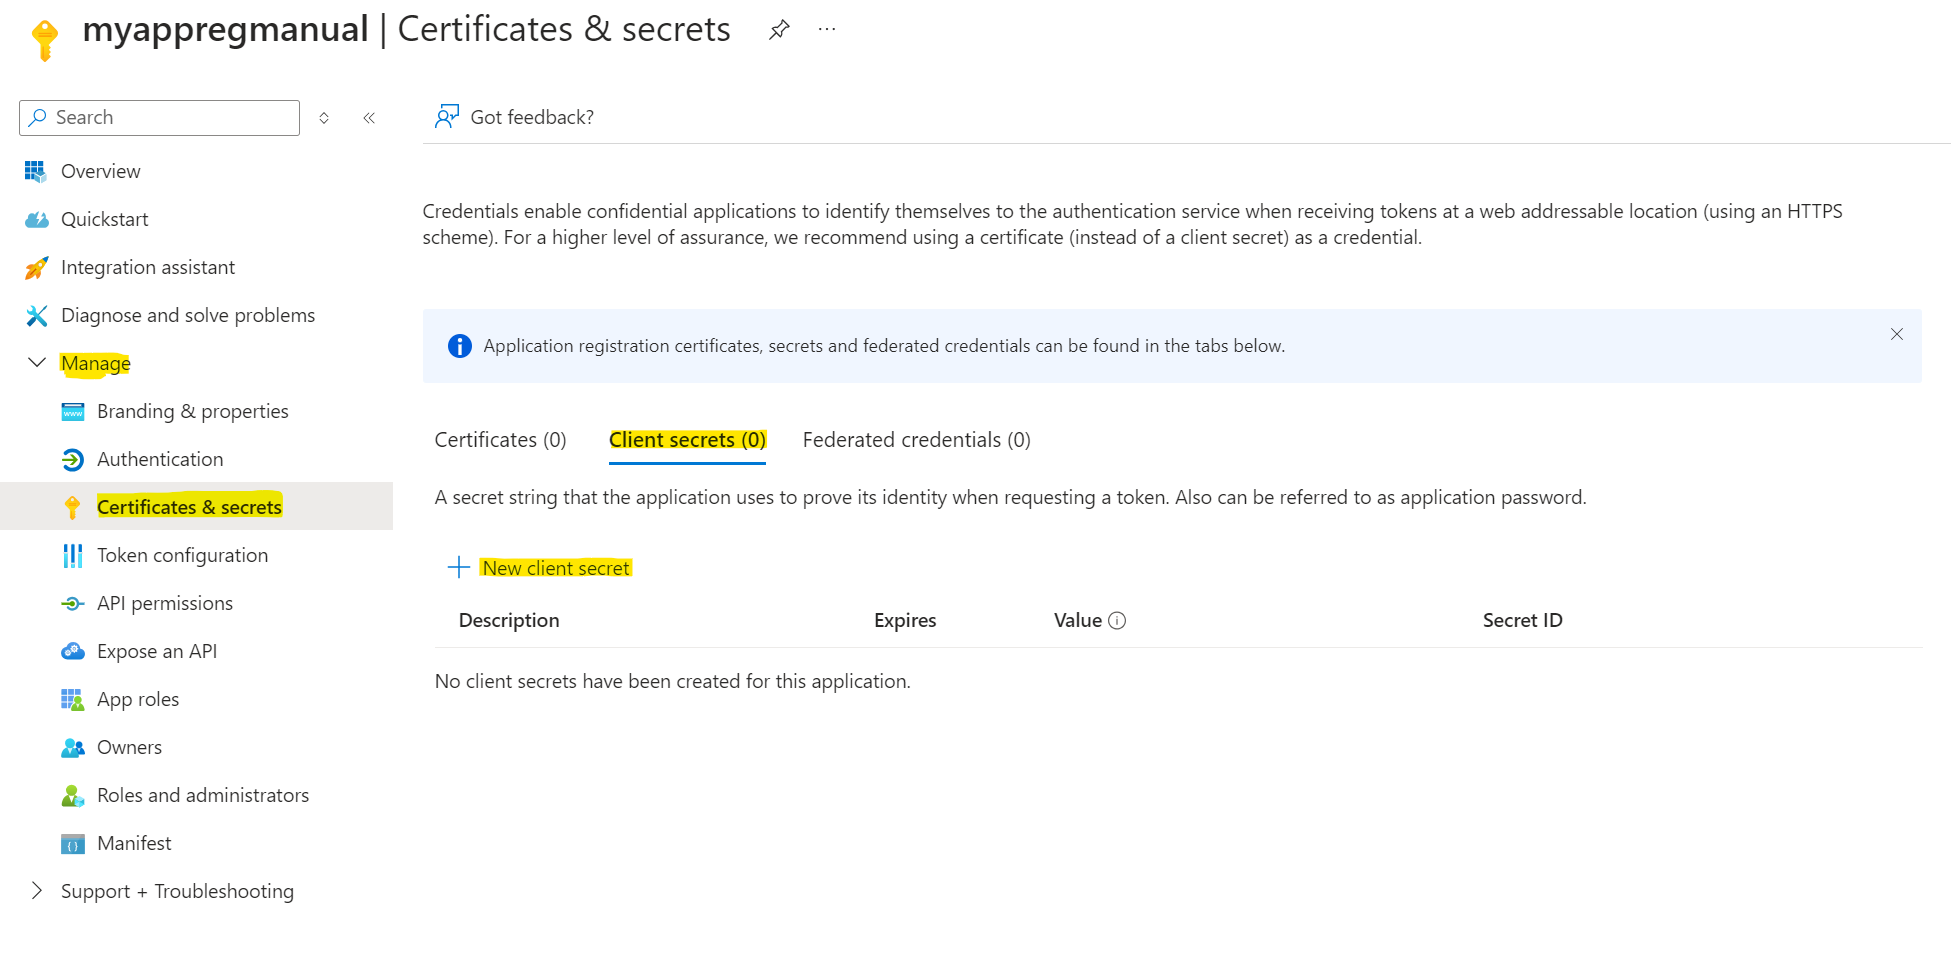
- 6. Create a new secret by filling out all the fields when pressing the “New Client Secret” button followed by add.

You will then see a secret popup matching your description and expiry date followed by a Secret ID and a value.
7. You will now be able to copy the secret value. You will need this to setup the service connection. An added tip, save this somewhere e.g. in a keyvault, so you are able to use this later on in other connections if required
Please be aware that authentication might fail due to the appreg not having minimum reader permissions on the subscription. As the app reg should be there (since you chose manual) I recommend you to perform the shared steps to grant access first and leave the service connection pane open so you could complete the verification and hit “save” the second the permissions are in order.
8. Write down the name of the app registration and proceed to the shared steps.
Shared Steps (repeat regardless of type)
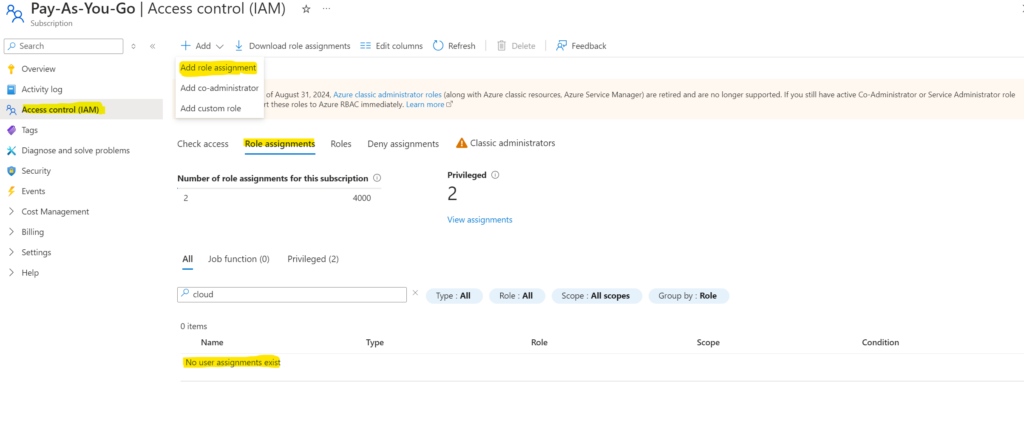
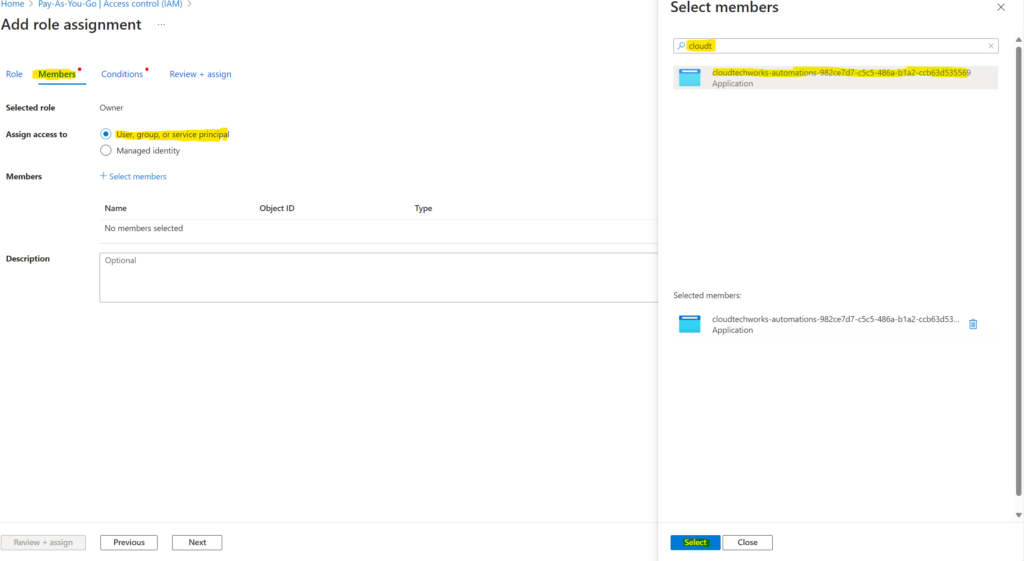
- 1. Keep the name of the previously created MI/App registration at hand. Now go to the subscription or management group in question depending on your chosen scoping. Under “Access Control (IAM)” verify that the registration has no permissions yet by pressing “role assignments” and searching for the MI/App registration. If the permissions are there, you are now done! Elsewise, please head on with step 8.
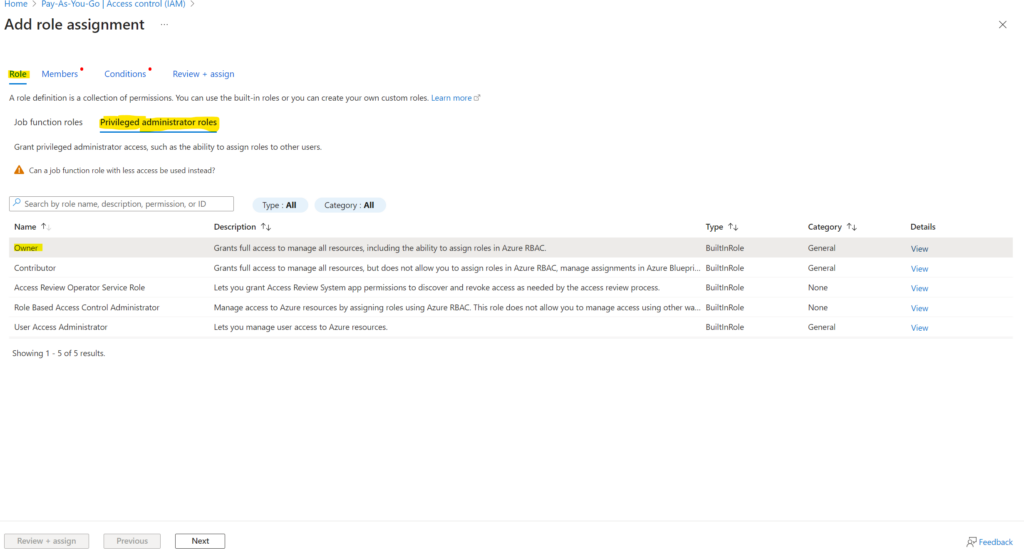
2. You must then Add a role assignment as shown below
- 3. When the role assignment pane opens, make sure you hit “Privileged Administrator Roles” and press “Owner”
- 4. You then hover to the member tab and add the recently created app registration like below:
5. Now hover over to the conditions tab and configure what the user can do. This is all up to your requirements. Afterwards hit “Review + Assign”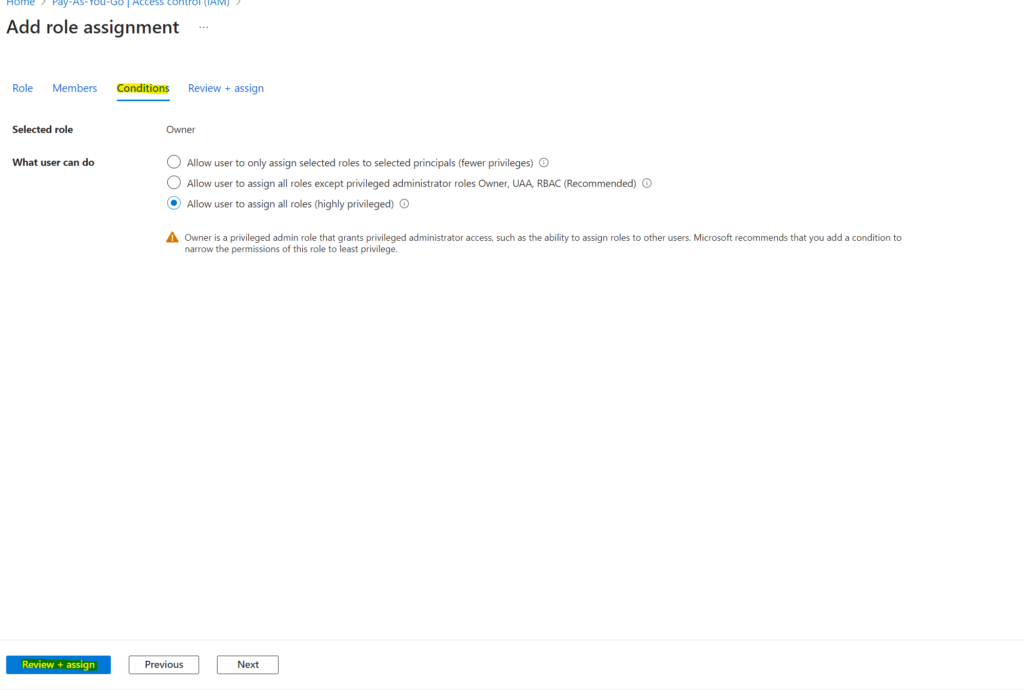
6. Now the permissions for this subscription are correctly allocated.
Please note that the way of setting these permissions in Azure, whether on a Subscription or a management group is the same, regardless of the chosen method of authentication using Service Connections
Why is it not working as I expected?
Reason for this could be quite simple maybe within azure at this point you do not have the appropriate permissions yet on either the subscription or management group level you configured the connection at.
As it would at that point reach azure you could double check in the audit log if you’re getting an access denied and go from there
What is considered out of scope
The following are Out-Of-Scope for this quick guide.
Managed Identity and Publish Profile, here’s why.
Managed Identity get’s a plus for not needing to rotate secrets/passwords, however, it is an extra resource that you would have to manage.
More on this here: Use an Azure Resource Manager service connection – Azure Pipelines | Microsoft Learn
Publish Profile are scoped at a single webapp. Aside some edge cases for authentication to a specific web app there is rarely a usecase to be found here.
How about existing ones? Do we need to change them?
In short, the answer is NO!
The reason for this is that even though providers of those service connections always try to find a way to improve and make your experience better try to take the operational risks away and help you stay in control the older methods are and will still be supported.
From the old days, and many people will be using it, the service connections use SPN (service principal name) or MI (Managed Identity) authentication and that’s not a wrong authentication method. The only down part to using an SPN for authentication would be a that you always have to manage your secret on the app registration that you’re using underwater
This is one of the reasons why Microsoft have made a workload identity federation which allows it to go via OIDC (OpenID Connect) authentication, and removes the complexity of having to keep track and manually rotating the secrets every (few) year(s)
For this so-called workload identity federation there are two main sources or types the manual one and the automatic one (see below for a breakdown)
In the repository here you can find several scripts to handle existing service connections and somuch more.
Leave a Reply